“Class” function
“Class” (Cloud Loop Addressing Support System) is a function implemented both in the Previdia/STUDIO software as well as the Inim Fire App, to support the operations of addressing, replacing or expanding the loops created with Inim Electronics devices.

Through the “Loop Addressing” item on the main menu of the App, you can view the list of systems enrolled in your account.
In this way, you can select an existing system and make changes to its loop or, alternatively, create a new system and proceed with configuring its loops.
After making changes to the configuration from the App, the App will save the relevant solution to your Inim Cloud profile or allow you to share the “.json” file.
Now it is possible to connect the loop to the control panel and the PC where we are using Previdia/STUDIO to the control panel.
Through the software it will be possible to check or change what has been done using the App and integrate everything with the control panel programming:
-
From the software you must access the programming of one of the loops page of the control panel being programmed.
-
Using the appropriate icon you can access the “Class” function.
-
Credentials are required to access your Inim Cloud profile, or, alternatively, you can ask where to find the “.json” configuration file locally.
-
A Wizard window opens where, within the App solution, you must select:
-
the system/installation
-
the control panel
-
the loop
-
-
The software shows two lists with the comparison between two solutions:
[A]
Previous configuration, as saved in the software solution
[B]
Configuration saved in the App solution
[C]
Column with device insertion icons
[D]
Button for associating zones with the selected device
[E]
Navigation buttons
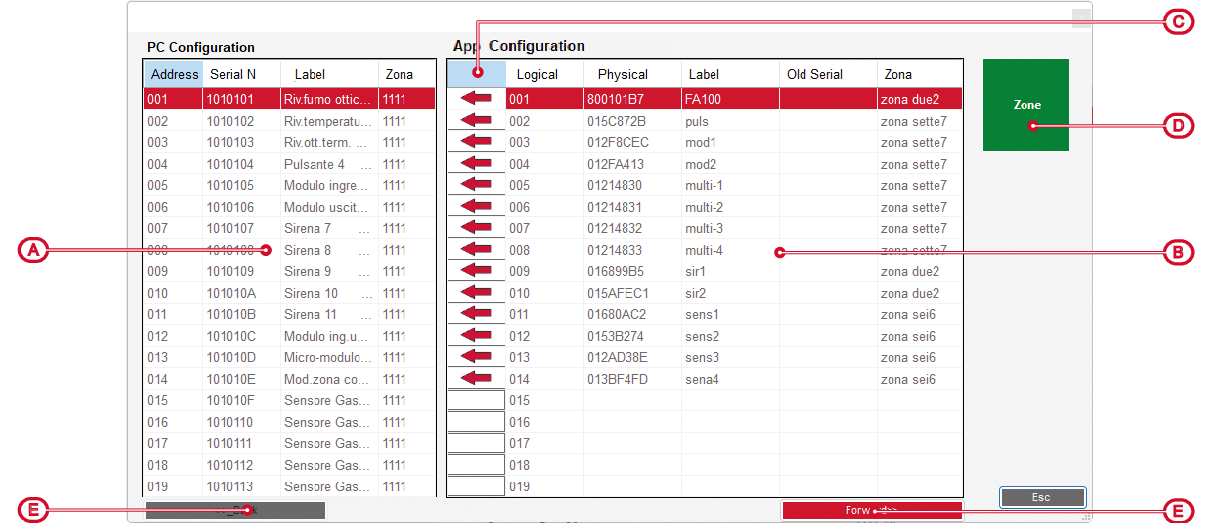
Any discrepancies or inconsistencies are shown in this section. To remedy this, you can change the logical address of each point in the configuration shown in the right panel [B].
icon
device in Inim Fire solution
device in Previdia/STUDIO solution

to be inserted
free position

to be inserted
already present

to be inserted
already present, but in different position

to be inserted
position not free, the device will be inserted in a free position

to be removed
to be removed

to be replaced with new device
new device already present

to be replaced with new device
new device missing

to be inserted
coincident with the one to be inserted
On selecting the Zones button the zones set up via the App are shown. The colour of this button shows:
-
yellow – the zones defined via the App do not coincide with those present in the software solution
-
green – this colour appears after having defined the associations between the zones defined via the App and those from the software
Note
However, it is also necessary to write the “Zones” page of the software in order to transfer the labels entered via the App to the control panel.
-
-
Proceeding to the next step, the software communicates with the control panel and scans the loop to verify that the connected devices can actually be seen by the control panel. Now on the left you see the list of devices added via the “Class” function and on the right the devices read from the real loop.
Any discrepancies between the saved configuration and the configuration actually detected by the control panel will be highlighted, thus allowing the installer to make the appropriate corrections.
icon
device in Previdia/STUDIO solution
real device in control panel
inserted present, factory data will be applied
replaced device present but of a different type than the one replaced, the factory data will not be applied
replaced device present coincident with the one replaced, factory data will not be applied 
not present present, factory data will be applied 
inserted not present, will be removed 
present not present, will be removed
inserted already present and coincident 
inserted already present, but of a different type, the factory data will not be applied 
inserted already present, but of a different type, the factory data will be applied 
replaced already present, but of a different type, the factory data will be applied 
removed present, it will be re-inserted and the factory data will be applied -
The software transfers the addresses to the devices on the loop and saves the configuration in the control panel.