ONVIF cameras
Control panels from the Previdia series are capable of capturing images from IP cameras equipped with ONVIF. These images can be displayed on screens or forwarded from a remote location via e-mail to provide the end-user with a clear understanding of what is happening in the environment signalling the alarm.

The video verification function is implemented inside the module for the LAN interfaces of the control panels (IFMLAN for Previdia Max and Previdia Ultra, PREVIDIA-C-COM for Previdia Compact and Previdia Micro).
|
|
|||||||||
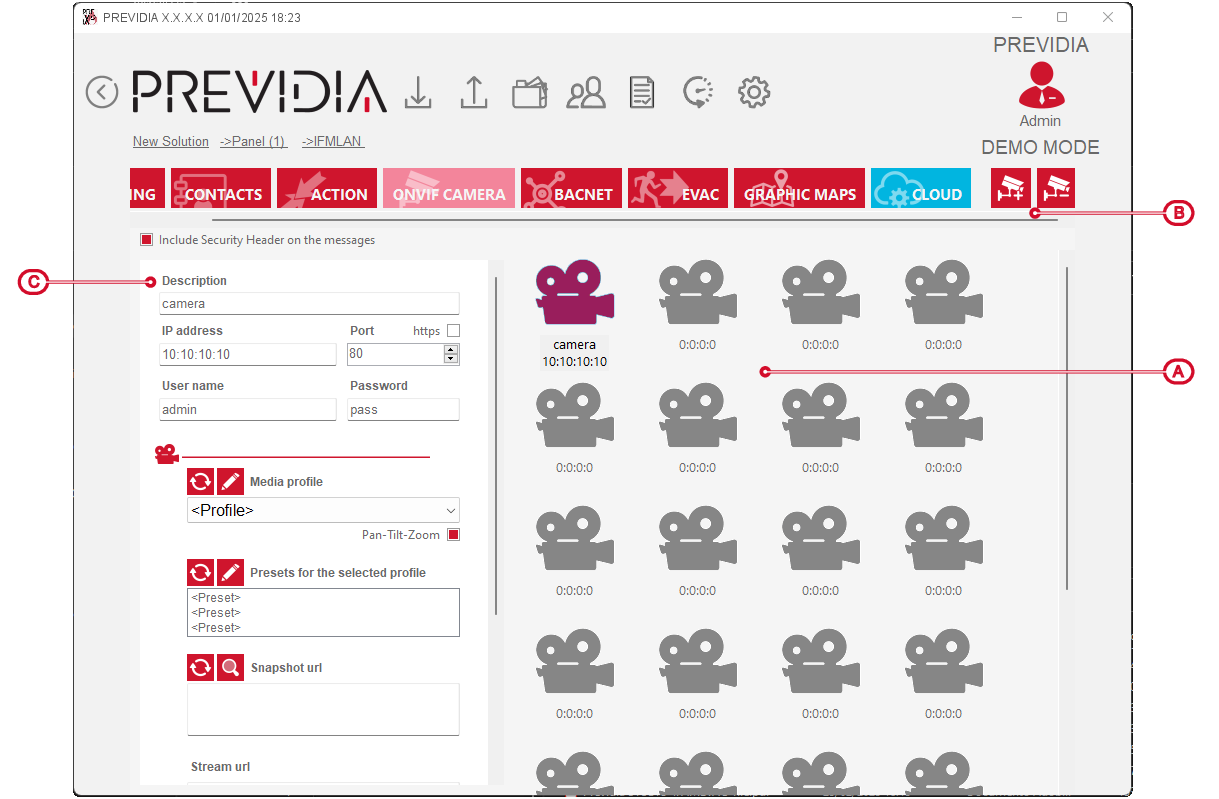
The section on the right contains a list of all the configured IP cameras (up to 200), while the section on the left contains the parameters of the selected camera.
-
Include Security Header in messages – this option, if enabled, includes the “Security Header” in the SOAP messages for the communication with Onvif devices.
-
Description – this is the description of the selected camera.
-
IP address, Port, https, User name, Password – parameter that permits access to the selected camera.
-
Multimedia profile – field for the selection of one of the multimedia profiles of the camera.
These profiles are listed following a read operation requested by pressing the
 button.
The button opposite
 opens a window in which all available profiles can be viewed and the “Token” and name of each one can be edited.
This window also provides buttons for adding or deleting a profile from the list.
-
Pan-Tilt-Zoom – this field indicates whether the selected camera is equipped with PTZ (Pan, Tilt, Zoom) capabilities.
-
Preset available for the selected profile – this section lists all the presets relating to the profile selected in the previously mentioned programming field.
These presets are listed following a read operation requested by pressing the
button.The
button opposite opens a window in which all the available presets can be viewed and where the “Token” and name of each one can be edited.This window also provides buttons for inserting or deleting a preset from the list.
-
Snapshot URL, Stream URL – this field allows you to view the addresses (URLs) of frames shots and audio/video streams.
These addresses are listed following read operation requested by pressing the
button.Clicking on the
 button in the section shows the instant frame of the selected camera.
 -
Sampling frequency – this is the time that must elapse between two successive frame shots (max. 60 seconds).
-
Save pre-event to SD card – if enabled, this option allows frames before the occurrence of an event to be stored on the SD-card.
This option applies to the first 5 cameras only. Please refer to the camera configuration paragraph on the graphic maps. -
Number of frames pre/post event – this is the number of frames (from 0 to 5) which will be saved to the memory before/after the occurrence of the event the camera is associated with.

Once the IP camera list has been defined, it is possible to establish a series of presettings that permit the identification of the specific IP camera and the correct preset in accordance with each event.

When programming the PREVIDIA-C-COM module, on the top left you also have a button to set up the connection via Inim Cloud service.