Graphic maps via web server
The Previdia provides monitoring functions based on graphic maps which the user can access through a web-browser.
for Previdia Max and Previdia Ultra

The IFMLAN communicator module that a Previdia Max or Previdia Ultra control panel can be equipped with, as well as providing the control panel with a Web server which allows it to be reached via any browser, also provides supervisory functions based on graphic maps.
The graphic maps can be defined in the programming section of the module, in the “Graphic maps” subsection.
for Previdia Compact and Previdia Micro

The Previdia Compact and Previdia Micro control panels can access the graphic maps via the PREVIDIA-C-COM communicator module or via Inim Cloud, accessible via the on-board Ethernet port. In the absence of the communicator module, programming is accessible via the specific button, reachable from the control panel programming page.
|
|
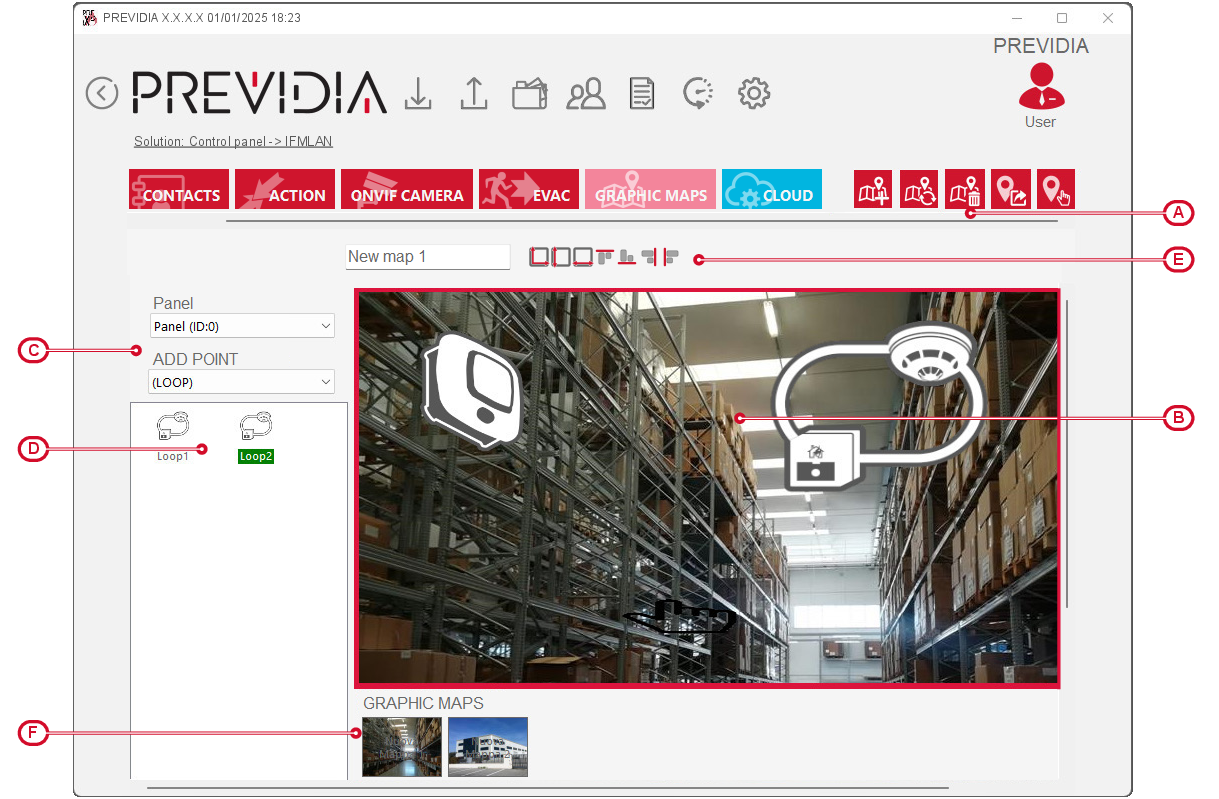
The creation and management of maps is done via the appropriate buttons at the top [A]:
|
Add a new map |
|
Button to open a new map, which is added to the list available at the bottom [F] |
|
Change map image |
|
Button to load the current map image. If an SD card is inserted into the module, it is seen as a normal peripheral and therefore usable. |
|
Delete map |
|
Button to remove the map in progress |
|
Add link |
|
Button to add to the map a “link” element, connection to another map |
|
Add action |
|
Button to add to the map an “action” element, an element that represents a control panel action |


To generate a map you need to click on the “Add a new map” button and then choose an image file to use as a background.
Inserting a system object, other than a link or an action, is achieved by first selecting the control panel and the type by means of the appropriate selection boxes [C], then by clicking on the respective icon in the section where they are listed [D], and finally clicking on the point on the map image where you want to position it.
The elements in green are those already positioned on the maps in progress.
The action icons in red indicate that the related action has been disabled.
Left-clicking on any one of the icons positioned on the map will highlight the icon which will then be shown in a frame that allows its resizing or repositioning.
All icons positioned on the map can be managed using the alignment and resizing buttons at the top [E].
Right-clicking on one of the icons positioned on the map opens a menu, depending on the type:
Element of the system
-
Settings – opens a window where you can:
-
position and size of the icon in detail
-
set the image to use for each status of the element, other than stand-by
-
associate the selection of the element with that of other elements in the same group
-
-
Delete – to remove the element from the current map
-
Connection – to add to its functions that of connecting to another map, selectable from those configured
Link to map
-
Settings – opens a window where you can:
-
position and size of the icon in detail
-
associate the selection of the element with that of other selectable links
-
-
Delete – to remove the element from the current map
-
Connection – to add to its functions that of connecting to another map, selectable from those configured
Control panel action
-
Settings – opens a window where you can:
-
position and size of the icon in detail
-
attach a label
-
select an action, using the appropriate fields:
-
standard action, selectable from those set in the “Actions” section of the control panel communicator being programmed
-
enabling / disabling
-
activation / deactivation
-
rearm
-
silence
-
sounder/flashers reactivation
-
-
-
Delete – to remove the element from the current map

For Previdia Compact and Previdia Micro control panels you have the access button to the Cloud settings, to be used in the event of loss of the PREVIDIA-C-COM communicator module.